
Projects and ideas
Sprachwahl

Motorcycle Windshield shortening

Click to enlarge!
Depending on the Motorcycle Modell and the drivers size, a shortening of the windshield can be a good solution to minimize the noise caused by airflow. But this task costs some courage and overcoming since you will be cutting on your bike. And of course a little skilled craftsmanship is needed. But with the right tools this task is quite simple.
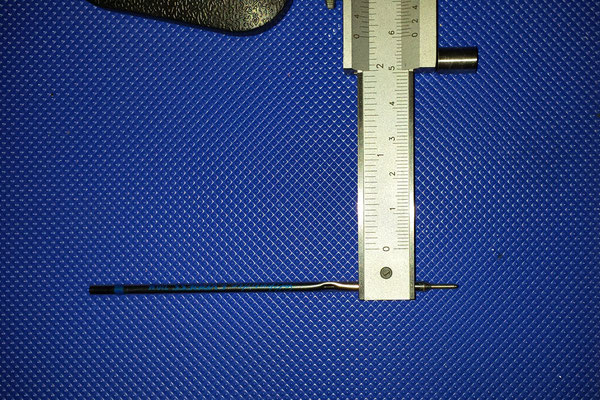
First of all cover the working area using masking tape like seen on the left side. The masking tape is perfect for this task since it can be removed very easily and it is perfect for marking. We used a marking caliper to transfer the cutting line in the desired height. The needle was exchanged by a ball pen refill, now when moving the guidance roller over the top edge of the windshield the ball pen refill will draw the cutting line (second picture below) to the masking tape. But, it is also possible without this tool, using a measuring tape to measure the height from the top on several spots making a dot. When enough dots are measured, these can be connected drawing a spline. This method requires a high level on accuracy, because the results depend on this step. Otherwise it can easily happen, that the windshield has to be shortened one more time.
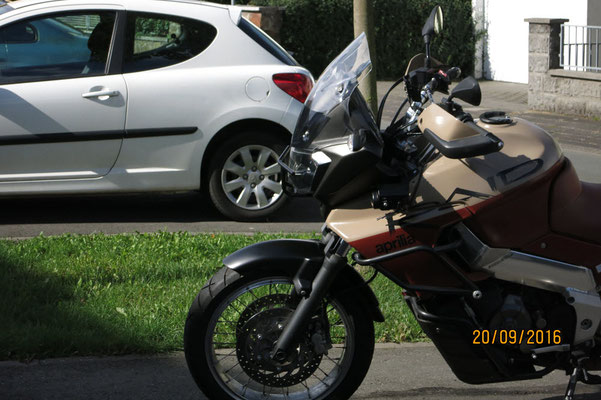
We used a Dremel for cutting in combination with the flexibel shaft which allows a precise cutting guidance. The cut off piece can be seen on the third picture below. Afterwards the cutted corners on the screen have to be smoothened by grinding followed by a polishing. The results of the latest two shortened Motorcycle Windshields can be seen starting with forth picture.


Rebuilding a aprilia ETV Rally Raid


History: We were lucky to find this motorcycle just poking through the internet. Since it was also the limited Edition of the aprilia ETV Rally Raid like ours with some nice
extras we could not resist buying it. There were only round about 380 bikes of that edition build! But sadly allot of the special parts of the limited edition were already missing when we bought
the bike (mudguard, crash bars, side panel and carrier, speedometer and so on). It was quite challenging carrying all these parts together again. Since we bought the bike in first place for spare
parts in the beginning just in case, we did not make any photographs. So the pictures of the braised motorcycle are from the previous owner which was so kind to provide me with these.
But what has happened? Well the motorcycle was unfortunatly standing in a garage where some wood caught fire. The rising heat melted the instruments, mirrors, windscreen and so on. The developing fumes settled together with the extinguishing foam on the whole bike. All unpainted plastic parts where even after many years still smelling very strong so they could only be thrown away, besides the stains from the fire weren't removeable either.
The idea of rebuilding the bike just came up hitting the registration number of the frame. Comparing it to our other bike showed that the two bike went of the factory right after each other. So at that point it was clear that the bike had to be rebuilded.
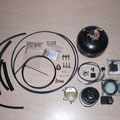
Developing our additional light system

The fact that we are riding our motorcycles also often in the dark or bad weather condition, we wanted to upgrade our vehicle lights for a better road illumination.
Then the possibility of seeing more what is happening in front of the road, means a gain of safety in the same time!
But the quality of existing additional lightsystems on the market for motorcycles couldn't convince us most of the time.
Already available systems on the market are from our point of view often not good enough produced.
On these parts you will find for example laser cutting marks. Some aluminium parts were powder coated without applying any base coat first. This leads to smaller adhesive strengh of the powder coating.
Also some mounting systems were so developt that you would have to drill holes in the motorcycle fairing to be able to mount the parts and make the electric. A thing what was not acceptable for us! Another disadvantage if fairing parts are used for mounting is that they usually don't have the stiffness which is necessary to minimize vibrations on the lights.
Some systems are only delivered with a single color cable for all wiring. That makes it harder afterwards to define clearly which wires goes where. Often the used terminals are very cheap nothing what is very reliable form our point of view. They easiliy lead to corrosion and are fault prone. That's why these terminals are only useful for a quick test or emergency repairment from our point of view.
The screws are often zinc coated steel screws. Those fasteners often start to corrode after a couple of years in usage. So on the parts of the fasteners where tools left their marks from screwing it will often lead to rust.
All the mentioned points are not acceptable in the price classes those products are handled.
That was the reason why we decided to develop and build our own additional light systems for our motorcycles. Since other motorcycle riders liked them because of their quality, we decided to build these light systems also for a bigger constituency.
Our advantages:
- high grade quality down to the detail
- all laser parts are deburred / decreased / sand blasted / primer coated / powder coated
- color coded wiring with vehicle specific wire set as well as high quality crimped cable connections which are squirting water protected. The main power wire from the battery to the relay is also with an extra thick isolation to minimize the risk of a shortcut caused by isolation damage.
- All connections are made with high quality stainless steel screws.
- Mounting spots are always on stiff frame parts (main frame / subframe) to realize a tight fixure on the motorcycle.
- comparable prices to competitors on the market


Still feeling unsure? 'Well then have a look at what some of our customers say to our product!
Here you will find some customer opinions to our light system!
Moto Abruzzo Ralph's in 42 Wochen um die Welt
Quality has got a name..... MOTRAG!
Project: Two-stroke scooter with LPG drive

The idea: Rebuilding a two-stroke scooter for the use of LPG and gasoline.
Time schedule: 3 month from the idea to the finished vehicle.
The details: The scooter should be able to change between LPG and gasoline just like it is done on cars. Another goal was to place the LPG components in a way they could easily be taken off for maintenance. And also all components should be mounted that the modification would not be visible.
To achieve these goals first of all we had to find the right vehicle. We decided to use an aprilia SR50 Ditech with an injection engine. That allowed us a precise switching between gasoline and LPG. The components from BRC for our scooter project where kindly donated by the company Gasdrive Technologies GmbH out of Althengestett Germany.


Two and a half month after project kickoff our scooter was ready for the first test rides and exhaust emission checks. The results leaded to different optimizations on some parts like for example the venturi nozzle or the pressure reducer.
Now we had a new goal, the vehicle should get a road use license. So we had to get a certificate which was not very easy since european laws for vehicles are very strict, and two-stroke scooters with LPG where not in use. So the scooter had to do the european homologation for vehicles to get a license for street use.
That not only took allot of time, it also killed allot of nerves. So another 20 months past by until the license was handed out. But the work and patience was worth it! Because not only that the vehicle was allot to be driven on the road, we also had the first scooter in Germany with that allowance.
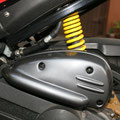


Rebuilding the aprilia ETV Caponord fuelline
Many motorcycles have plastic connectors on their fuellines from the fuel tank to the motor. But these break easily when they get old. In worst case when your motor is hot that can lead to a burning motorcycle.


The plastic connectors are often pressed to the fuelhose, that means when your on the road and a connector brakes you won't have a chance to get it fixed easily. As a touring driver you will allways want to avoid such a scenario. And that's why the plastic connectors where changed right away against metal connectors which are also available in our shop. The pressed steel hose was replaced by a fabric reinforced rubber hose from a car part supplier. As a additional protection the hose was covered by a corrugated tube. The hose brackets are from air pressure supply such as the brass hose connector part which is hard-soldered to the connecting piece of the throttle.
All work was done with a dremel and a gas jet for the soldering.
Production of carbon fiber parts
For quite a while now we are also making carbon fiber parts. Our parts reach from carbon fiber plates with one or two sided high quality sight surfaces up to motorcycle parts for our own bikes. The mould for our parts are build by ourselfs too.
The plates are produced in a press or with vacuuminfusion. For the production of the motorcycle parts we use the vacuuminfusion and the resin tranfer molding method at the moment. Instead of using clear coat for uv-protection for the carbon fiber parts we use a uv resistant surface resin.


